I have recently been experimenting with various new back exercises with my exercise physiologist. I have been getting significantly stronger in this area, so despite covering this topic before, I have a few new exercises that I wanted to discuss. It is important to train the various different back muscles to make sure you are building muscle or preventing deterioration. I will be covering a few exercises, providing the link to a video for a visual demonstration and a written explanation. To note, the image used for this blog post comes from Athlean-X blog “Best Bodyweight Back Workout.”
Athlean-X Video on Building Your Back
These next few exercises come from Athlean-X’s video “Build a Big Back with Bands (NO WEIGHTS!)” The first exercise is band-resisted pull-ups, which I do not do and would not recommend to anyone with muscular dystrophy as this exercise can have a heavy impact on muscles. For these next exercises, I will attempt to describe it but it would be most effective if you watched the video for a visual demonstration. For these exercises, it is important to hold the exercise isometrically and envision that you are pinching a pen with your shoulder blades.
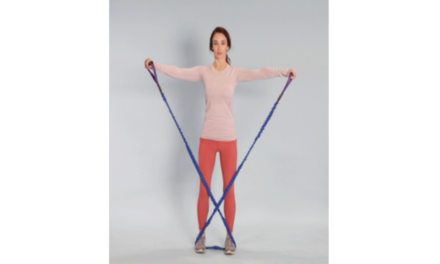
The second exercise is the “band-bell” rows, which has been covered before in a previous video but remains one of my favourites. This involves you slightly bending your knees, holding the band as far apart as your feet, and then using your back muscles to drive the band close to your chest. This exercise can be done by attaching a band to an appropriate handle against a wall.
The third exercise is the high-to-low kneeling banded row. This exercise involves you attaching to a door or piece of equipment higher than your body. You will then kneel down on your knee and drive your elbows as close to you can as your body.
The fourth exercise is the two-for-one arm row. It involves holding the band isometrically with one hand. You grab the bend with the other hand and drive that arm backwards, attempting to pull as far back as you can.
The fifth exercise is the straight arm push-down, which is something I am not the best at, but it enjoy it as it targets some weaker areas of my back. It involves you attaching the band higher than you, keeping your arm straight and driving your arms down towards your body.
T he sixth exercise is one recently introduced to me called pullovers. It involves you lying down on your back, attaching the band behind you, and attempting to move them past your chest.
The seventh exercise is the Zeus row. Attach the rubber band high, get on one of your knees, and pull the band close to your body.
The eighth exercise is the wrap-around row. It is similar to the “band-bell” rows, but you put the right hand over the left and pull to the right and do the same thing for with the left hand.
The ninth exercise is the banded shrug. It involves you putting the band beneath your feet and attempting to shrug or move your shoulders upwards. This exercise is great to get your upper back.
The tenth exercise is the laying face pull, and is not one I am familiar with, but excited to try it. It involves you lying on your back and driving the rubber band close to the floor.
The eleventh exercise is called Banded good morning and is not something I would recommend to someone with muscular dystrophy as it requires you to squat to some extent. It involves you attaching the band to your feet and neck, and moving downwards as if you were picking something up.
The twelfth exercise is called Superman Press, which I am not able to do the way it is performed in the video. I do perform a variation where I do not move my legs up, but use my lower back and try to drive my neck up as far as I can off the ground. I also do a variation where I do not move the neck and legs, but attempt to move my arms upwards, away from my body. I can understand that this description is not that great, but I cannot find any videos or images doing this.
Conclusive Remarks
I hope you have found some great rubber band back exercises to incorporate into your routine. I attempted to explain the exercises, but I recommend watching the video. Hopefully, my explanation for the two variations for the last exercise is enough to help you begin experimenting, or you could even ask a physical therapist to help you out.